
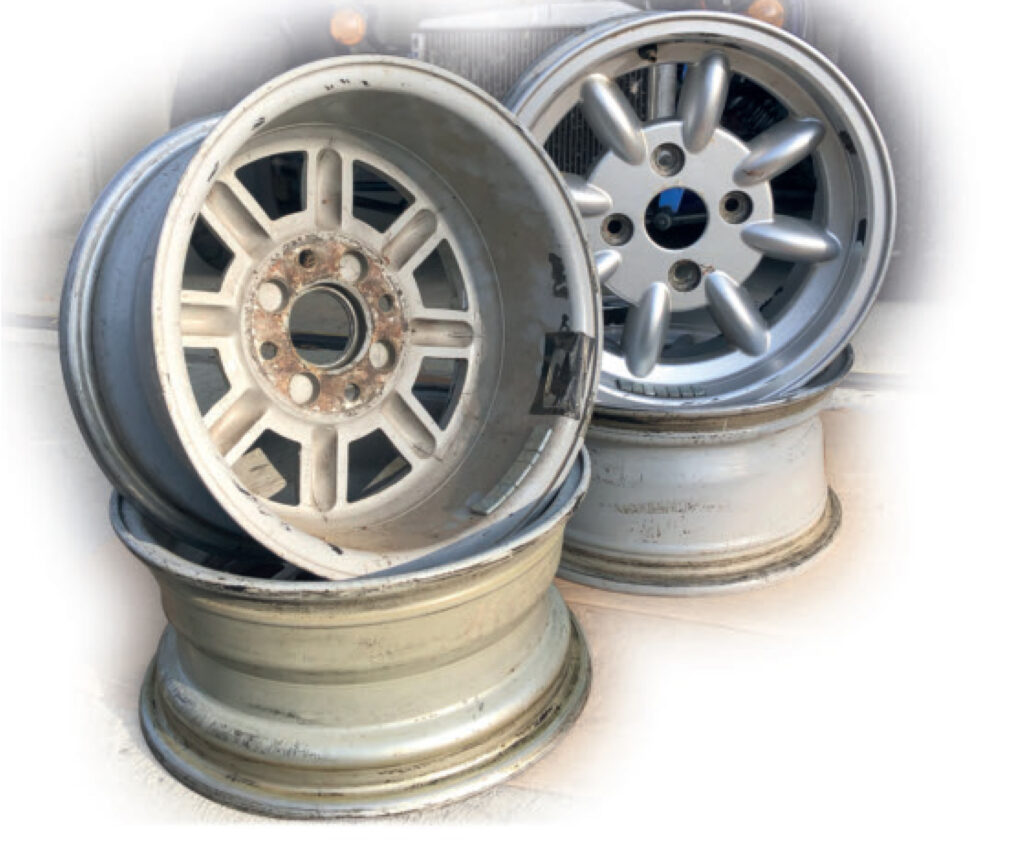
Behind the Scenes: Giving a Classic Set of Minilites a New Lease of Life
Here at Mint Alloys, we see wheels arrive at our workshop in every imaginable condition. From everyday kerb scuffs to severe winter corrosion, our goal is always the same: restoring them back to a flawless factory standard. Recently, we had the pleasure of welcoming Malcolm Anderson from the Caterham owners’ magazine, Lowflying, who brought us a “tatty” collection of 13″ Minilites to see exactly how our multi-stage refurbishment process works.
Malcolm had picked up seven discarded wheels from a race team, initially unsure if there was even a matching set in the bunch. After a quick wipe-down at home, he identified four matching wheels and decided to get them professionally refurbished. A recommendation from a friend pointed him directly to our workshop at Wrest Park in Bedfordshire. When he reached out, he discovered that Mint Alloys owner Andy Baylie was actually a former Caterham owner and a past Caterham Academy Champion—meaning the rare wheels were in the ultimate safe hands.
If you have ever wondered what goes on behind closed doors at our Silsoe facility, here is an expanded, step-by-step look into the detailed workshop journey of those classic Caterham rims.
1. The Gooey Chemical Strip
Before any fresh styling can begin, the old layers must go. After removing the tyre valves and old balancing weights, the wheels are prepared for our advanced chemical stripping tanks. This process completely dissolves decades of old paint, primer, and failing lacquer, taking the wheel right back to its bare aluminium alloy skin.
While the exact stripping process we use remains a closely guarded workshop trade secret, Malcolm got a glimpse of the removed residue in our waste bin, describing it as a “gooey mess”. Once out of the chemical tanks, the stripped wheels were far more recognisable, allowing the original maker’s marks—”K&N 6Jx13″ and “Made in UK”—to be clearly read on the inside of the mounting face for the first time in years.
2. The Hand-and-Eye Surface Prep
Even though the paint was gone, the wheels were still quite tatty, showing notable scrape marks on the outer rims and a fair amount of corrosion where water had previously crept under the old paint. Andy’s first task was a rigorous manual inspection. Using his fingers to feel for scuffs and hidden imperfections, he gave each wheel an initial rubdown with 80-grit sandpaper to buff off the stubborn marks and any remaining traces of old paint.
He then moved on to a powered airline sander—still utilising an 80-grit pad—meticulously working his way around the spokes and inner surfaces to clean off, flatten, and reshape any deep dents or scuffs. After each stage of sanding, the loose metallic dust was blown off with an airline so the surface could be felt again by hand for any remaining nicks or rough patches.
3. Entering the Media Blaster “Bunker”
Once Andy was completely satisfied with the physical shape of the wheels, they were moved to our industrial media blaster. This massive machine, manufactured by Pangborn in the UK, features seriously heavy doors and industrial locks, leading Malcolm to joke that it resembled a mini-nuclear bunker from a 1980s Cold War film.
Inside the machine sits a huge rotating turntable that spins the alloys through a controlled maelstrom of fine alloy powder. We use a specialised blasting media that is very close to the physical makeup of the wheels themselves, ensuring the exposed, soft aluminium is thoroughly cleaned without sustaining any structural damage. Each wheel spent exactly three minutes on the table per side. After just six minutes of blasting, they emerged as brilliant, shiny bare metal with all historical corrosion marks completely erased. Furthermore, this process perfectly ‘keys’ the bare metal surface, creating the ideal texture to help the new paint bond tightly.
4. Critical Masking and De-Gassing
Even after the dramatic transformation in the blaster, the wheels weren’t quite ready for the paint booth. A final compressed air blow and a gentle rubdown with a sponge pad cleared away the last traces of media dust. Spinning the wheels in his hands, Andy gave them one more inspection, flat-sanding two of the Minilites a little further to completely eradicate the last remaining nicks.
Next came the vital preparation work. Andy carefully masked up the rear mounting face of each wheel with heavy-duty tape. This step maintains a strict metal-on-metal surface between the wheel and the car’s hub when fitted, which reduces on-road wheel vibration and helps tyre fitters get a significantly better balance. It also preserved the historic manufacturer stamping from being buried under new paint layers. Rubber bungs were then pushed firmly into each stud hole and taped down, ensuring the wheel nuts would later tighten directly against the inner metal surface rather than soft paint.
With a final blast of air, each wheel was hung on a swan-neck hook secured through the value hole. This specific hook tilts the wheel forward at a precise 15-degree angle, which is key to preventing the paint layers from pooling at the base during spraying. Before a single drop of paint was introduced, the wheels were placed into our massive ovens for 20 minutes at 200°C. This process is called ‘de-gassing’, where the intense dry heat successfully bakes out the last remaining volatile impurities trapped inside the porous alloy.
5. Powder Priming with a Tech Twist
Our custom spray booth is bookended by twin walk-in ovens the size of en-suite bathrooms, featuring its own built-in, slow-moving water wall. This hypnotic waterfall serves a highly functional purpose: it continuously filters and collects paint overspray, preventing the booth’s systems from clogging up.
Our paint technician, Rob Giles, hung the first wheel in front of the waterfall and applied a perfectly even coat of white dry powder primer. Starting expertly on the inside of the rim, he flicked the gun across the barrel before turning the hook to coat the front face and navigate the tight, fiddly apertures of the Minilite spokes. Once the set of four was primed—alongside a set of BMW BBS wheels to maximise the oven run—all eight wheels went into the oven for exactly 23 minutes at 175°C. Rob set a loud, critical alarm on the oven timer to ensure the primer baked to a flawless, smooth finish.
While the primer baked, Malcolm even got to watch Andy operate our precision Diamond Cutting lathe on an AMG Mercedes wheel, observing how the machine measures cuts to a tenth of a millimetre.
6. The Wet Paint and Steampunk ‘Sparkle’
When the oven timer rang, Rob brought the primed Minilites out to cool. The baked primer had done a superb job of completely smoothing out the underlying alloy surface. However, before any colour could go on, Rob checked the wheels with a handheld thermal scanner. Because different sections of a wheel contain varying amounts of metal, the centre hub and the thin outer rim cool down at different rates. Testing ensured the metal had cooled sufficiently and uniformly across the entire structure to allow a perfect paint bond.
Once the temperatures were ideal, Rob used a specialised wet-paint gun—which Malcolm joked looked like a smooth-spraying, 19th-century steampunk dentist’s device—to apply the liquid silver colour. Rob repeated the same meticulous inside-to-outside routine around the spokes. Once the flat silver base coat was dry, it received a second specialised coat of ‘sparkle’—a vibrant metallic flake that gives the reflective face of the spokes an unmistakable automotive shine.
7. Curing the Clear Protective Armour
While the wheels looked stunning at this stage, raw wet paint remains soft and highly vulnerable to road salt and stone chips. To permanently lock in the look, they required a final protective layer of clear lacquer.
The lacquer is applied as a dry powder, and as it coats the silver metallic paint, it temporarily turns the entire wheel a flat, matt white. While this stark white covering can come as a surprise to onlookers, it is an essential visual guide for the technician to ensure 100% complete coverage across the spokes. Any microscopic gap left in the lacquer would eventually allow water ingress, triggering future corrosion. The wheels returned to the oven for one final bake, which permanently bonded the coating to the paint and dried the lacquer into a crystal-clear, glassy shield.
The Final Verdict
Using heavy-duty oven mitts against the intense heat, the finished wheels were hung to cool down. After about ten minutes, the hooks, bungs, and now-crispy masking tape were cleanly stripped away from the hub faces. Andy gave the wheels a final critical ‘feel’ and visual inspection, passing them with flying colours.
To Malcolm’s eye, the results were better-than-new, sporting an impeccable, mirror-smooth metallic finish. While loose wheels brought in by private owners and the motor trade are the absolute mainstay of our daily workshop operations, Malcolm noted our secure facility was also busy handling full vehicle makeovers for an Audi, a BMW, and a Mazda MX-5 on the very same day.
Whether you have a set of rare, vintage track wheels that need specialised care or modern daily alloys suffering from unsightly pothole wear, our team applies this exact same multi-stage, uncompromising craftsmanship to every wheel that enters our workshop. Get in touch with us today to schedule your upcoming drop-off!